

How To Install Graphics Card In Hp Desktop
Z7_3054ICK0KGTE30AQO5O3KA30N0
hp-concentra-wrapper-portlet
![]() Deportment
Deportment
HP and Compaq Desktop PCs - Installing or Replacing a Video Card
This certificate applies to HP and Compaq desktop PCs with Windows 95, 98, Me, and XP.
This document provides step-by-step instructions to remove or supercede a video card in an HP or Compaq desktop PC.
caution:A power supply upgrade may be required for graphics carte upgrade, check with graphics card supplier. Y'all may besides discover power requirements information in the system requirements for the new video menu.
note:The steps in this article are not specific to one type of case design. Your PC model may expect dissimilar than the images used in this article.
note:Brand sure the new video card meets the minimum recommendations for software applications you volition be using.
Before you lot begin
-
Many HP and Compaq PCs exercise not have an AGP or PCI Express (PCI-E) slot on the motherboard. Visually inspect the motherboard or refer to the production specifications for your model before attempting to install an AGP or PCIe video card.
-
If y'all programme on upgrading a PCI-East graphics bill of fare, a power supply upgrade may be required for graphics card upgrade, bank check with graphics card supplier.
-
Notice out if your HP or Compaq PC has integrated video on the motherboard. When performing the steps in this article, onboard video will need to be disabled in the BIOS to avoid installation issues on some models.
-
You will need a screwdriver.
-
HP strongly recommends using an anti-static wrist strap and a conductive foam pad.
-
Detect a clear, apartment, stable work surface over a floor that is not carpeted.
-
If possible, impress this document. You tin can refer to the printout after the PC is restarted or when an Internet connection is not available.
Step 1: Removing video drivers
Use the following steps to remove the current video software drivers and settings:
-
In Windows XP, click Start, and right-click My Computer.
In Windows 95, 98, and Me, correct-click the My Estimator icon on the desktop.
-
Click Backdrop from the list that appears.
-
In Windows XP, click the Hardware tab, then the Device Managing director button.
In Windows 95, 98, and Me, click the Device Manager tab.
-
Click the plus sign (+) next to Display adapters.
-
Click the video device title that relates to the brand of video card beingness used.
-
In Windows XP, click Uninstall (the pocket-sized picture of a computer overlaid by an 10).
In Windows 95, 98, and Me, click Remove.
-
Click OK when a warning window appears.
-
Close all programs and shut downwards the estimator.
Step 2: Opening the instance
Use the following steps to open the example:
warning:The edges of metallic panels tin can cutting skin. Be careful not to slide skin forth whatsoever interior metallic edge of the reckoner.
caution:This product contains components that can be damaged past electrostatic discharge (ESD). To reduce the adventure of ESD damage, work over a non-carpeted flooring, use a static dissipative work surface (such equally a conductive foam pad), and wear an ESD wrist strap continued to a grounded surface.
-
Unplug all cables except for the power. Write down each cable location if you lot do not already know where it connects.
-
Unplug the power cable and with the power cable removed press the Power button.
-
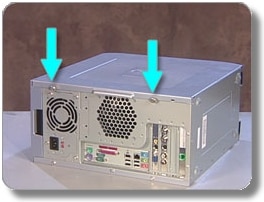
Remove the screws on the rear of the desktop (Your PC case may appear different than the images in this document).
Figure : Instance of screws for the side console
-
Slide the side panel off from the rear of the desktop.
Figure : Removing the side panel

Step 3: Removing the video menu or slot cover plate
If you are replacing a video card, utilize the post-obit steps to remove it. If you are installing a new video menu, remove the screw and encompass plate next to an open slot in the chassis and skip to next step.
-
Locate the video card within PC case. Utilize the video cable connection on the back as a reference indicate.
-
Disconnect any cables that are plugged into the back and sides of the video card, if any. Carefully note where each cable was installed.
-
If the video card is an AGP carte, disengage the clasp that holds it in identify, if whatsoever (The clasp may await different than the one shown in the paradigm below).
Effigy : Example of one type of AGP clasp.

-
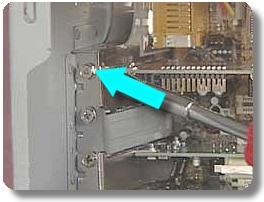
Remove the one screw that holds the video bill of fare to the PC example. If a metal plate covers up the screw, and then remove this plate first.
Effigy : Screw that retains the Video Card
-
Grasp the video card past its edges and slide it out of its slot.
Figure : Removing the carte.

-
If the card is nonetheless good, place it in an ESD container for safe storage and gear up it aside.
Stride 4: Inserting the new card
Apply the following steps to install a new video carte:
-
Insert the new video card into the proper slot. The bill of fare should slide in firmly and direct into its slot. The retaining bracket should slide against the inside edge of the back of the PC. The spiral that attaches the bill of fare to the chassis should besides line up to the hole in the chassis. If not, the bill of fare is probably incompatible with the chassis or is in the incorrect slot.
-
If the video carte du jour is agp, attach the clasp onto the menu.
-
Attach the bill of fare with 1 retaining screw.
Figure : Screw that retains the Video Menu
-
Connect all cables into their original positions.
annotation:
Some video cards require an South/PDIF internal audio cable from the motherboard to the video card for audio used by DVI Dual link output.
Step v: Replacing the cover
-
Lucifer the side panel with the tab openings in the example.
Figure : Example of tabs in side panel

-
Insert the side panel and slide it forrad.
Figure : Replacing the panel
-
Fasten the screws to secure the side console.
Figure : Example of screws for side panel
Step vi: Installing software and drivers
-
Connect all cables and plough on the PC.
-
If your PC was using on-lath video (no video card), then disable on-board video in the BIOS to prevent possible setup problems:
-
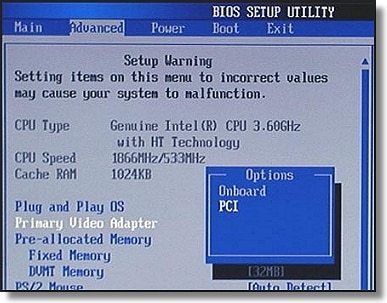
Press the F1 primal repeatedly when the first screen appears.
A BIOS setup screen displays (BIOS setup screens vary depending on model of PC).
-
Apply the directions on the BIOS screen to discover and disable on-board video. The on-board video setting is normally on the Advanced page.
note:
In some cases, the BIOS does not have the pick to disable the onboard video. In this case, select AGP or PCI as the chief output. The BIOS and the operating system should and so discover the new video card instead of the onboard video.
-
Press F10 to relieve the settings and exit.
Figure : One example of a BIOS Setup Screen
-
-
Use the software installation instructions that came with the video card to install the new software. Normally, when Windows finds the new hardware, a message is displayed prompting to insert the installation CD.
If the video bill of fare is a replacement card and is the same model every bit the one that was removed, Windows should notice and install the software automatically. If needed, you may likewise install the Video driver using the HP Application Recovery software that comes with your PC.
note:
Original and updated drivers may also exist on the HP Website. Go to Software and Driver Downloads site and enter your PC model number to observe software and driver downloads.
-
When Windows opens, it should find new hardware. The screen resolution volition be depression and volition probably appear larger than usual. This is normal.
-
If a window appears stating that information technology needs aid finding particular files, place the commuter disc from the video menu manufacturer into a disc drive. If this does not help, browse to the following pathnames, one at a time, until the file is establish:
-
C:\Windows\inf
-
C:\Windows\options\cabs
-
C:\Windows\system
-
C:\Windows\system32
annotation:
If files nether these pathnames do non announced, double-click the C:\ hard drive icon from My Computer. Click Tools, Folder Options, and click the View tab. Remove the check marks from Hide protected operating system files, and select Evidence hidden files and folders. Click OK.
-
-
Restart the PC when instructed by Windows.
The new video menu should exist installed and working correctly. If not, re-open the case and make sure the card is seated correctly and in the right slot. If it yet is non working correctly, it may be necessary to contact the manufacturer of the video carte du jour.

Source: https://support.hp.com/rs-en/document/c00007413
Posted by: beresfordbrishemed.blogspot.com
0 Response to "How To Install Graphics Card In Hp Desktop"
Post a Comment