

How To Install A Storm Door With One Sidelight
How to Install and Replace a Storm Door
Updated: October. 01, 2022
Make a perfect installation even in less-than-perfect situations.

New storm doors are easier to install, with enough of standard sizes to fit almost whatever entryway—but there are still tricky spots. Follow a pro through the installation process and learn the tricks and techniques that the instruction manual doesn't encompass.
You might also like: TBD
- Time
- Complexity
- Price
- A full 24-hour interval
- Intermediate
- $101–250
How to Supervene upon Screen Door Overview
You no longer have to put up with a rusty onetime storm door that bangs shut every time the kids become out. Modern storm doors are stronger, smoother and a heck of a lot more than handsome than the doors we grew upward with. In fact, installing a new one is i of the least expensive ways to apparel up an entry.
Replacing an old one is easier than you might recollect. Manufacturers have made installation more DIY-friendly by providing standard sizes that'll fit nearly whatsoever door opening and simpler installation kits. However, you'll detect some sticking points. The following step-by-step directions walk you through some tricks and techniques of how to install a screen door or storm door you won't discover in whatsoever instruction manual.
If you lot have a hacksaw, screw gun, a curt level and a pair of side cutters and ii to three hours, y'all're on your mode to saving the cost of a professional tempest door installation. Replacing an onetime storm door or installing a new one is a perfect Saturday morning time project, fifty-fifty if yous take limited carpentry skills.
Stride i: Selecting the door
Measuring for a storm door begins when you learn how to detect the size of the storm door yous need, simply measure the height and width of the chief door. Most front end entry doors are 36 in. broad and crave a 36-in. storm door.
For this article, we chose a "full-view" storm door. The one nosotros show has removable screen and glass panels that you change each season. The other common blazon, a "ventilating" tempest door, has glass panels that slide open or closed over the screen, much similar a double-hung window.
Nigh every storm door sold is reversible. That is, you tin can install information technology with the hinge on either side. The manufacturer's directions tell you how to do it. When you lot buy information technology, you don't have to specify which way the door must swing.
Y'all typically mountain tempest doors to the exterior door trim using "Z-bars." The swivel-side Z-bar may already exist screwed to the door (ours was), or yous may have to mount it once you determine the door swing direction. On some doors, you'll too have to drill holes for the latch.
Step 2: Getting started
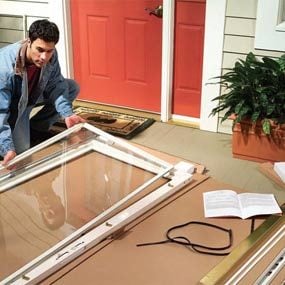
Photograph 1: Inspect the door before starting
Option a flat surface area near the entry door, lay the box flat on the ground, fold it open and bank check to make sure you accept all the parts.
Begin the project by folding open up the box and removing the drinking glass storm panel. Set it and the screen panel in a safety place out of the current of air. And so cheque for damaged or missing parts past comparison the contents with the parts list in the instruction manual. (Ours had been returned, repackaged and sold equally new. One of the parts had already been cut to length and the mounting screws were missing.) Utilize the cardboard as a work surface to foreclose scratching the parts while you work on the door. Your door may come up with a protective plastic film. Only skin off those areas needed for installing hardware during installation. That way the door will be protected from scratches. After installation is complete, peel away the plastic.
Decide the door swing. In general, swivel the storm door on the aforementioned side as the main door. Even so, consider these exceptions:
- Adjoining walls. If in that location's an bordering wall or runway, it's best to have the door swing against it; otherwise entry can be bad-mannered, especially if you're carrying groceries.
- Electrical. Will the door open against whatever outdoor light fixtures? Volition the doorbell or lite switch wind upwards on the latch side where they belong?
- Wind. If there's a strong prevailing wind, information technology'southward best to have the door hinge side face the wind direction. That manner, sudden gusts tin can't fling it open up and intermission it.
Why a storm door?
A traditional storm door was a real workhorse. Information technology protected the handsome only vulnerable wooden master door from harsh weather condition and helped to insulate information technology.
Today's better insulated and protected main doors take piffling need for a storm door and are often eliminated from new homes, showing off fancy front doors. However, the "full-view" storm door (like the one we're installing here) even so showcases the main door and, when screened, allows you lot to have advantage of those cooling summer breezes besides.
Pace 3: Out with the one-time tempest door
Taking off an erstwhile aluminum door is usually only a instance of unscrewing the mounting screws on the door, closer and safety chain. But sometimes at that place's caulk around the frame. You tin usually cutting through the caulk with a utility pocketknife. Simply worse nonetheless, you could find quondam caulk between the frame and the door casing. If so, you'll have to pry the frame abroad with an erstwhile chisel and scrape the trim surfaces clean. A rut gun may help soften the caulk. Get rid of an old door by throwing the drinking glass panel in the trash, and so cutting up the aluminum frame and door with a round saw and a carbide-tipped blade. Toss the pieces into the recycling bin.
Wooden storm doors more often than not have hinges that are mortised (notched into the wood) and screwed to the door casing. Don't worry about the swivel or latch recesses. When you install your new storm door, they'll be hidden behind the new door frame.
Step iv: Prep the opening
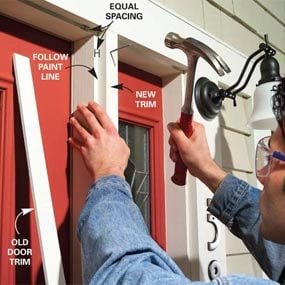
Photo 2: You may need a trim extension
Add together a trim extension if needed to doors with sidelights. Prime number and paint the new trim, position it with a reveal equal to the other trim and then nail it into place.
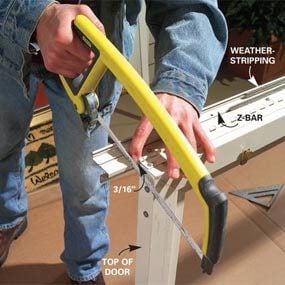
Photo 3: Fasten the hinge-side Z-bar
Confirm the door swing direction and fasten the hinge-side Z-bar to the correct side (if necessary). Mark a cut line on the Z-bar iii/xvi in. above the summit of the door with a square. Slide the weatherstripping aside and cut the Z-bar with a hacksaw. Use an 18- to 22-tooth-per-in. hacksaw blade

Photograph 4: Cut the Z-bar to length
Measure from the outside lip of the threshold to the pinnacle door casing. Transfer the measurement to the bottom of the swivel-side Z-bar and cutting it to length, matching the angle on the threshold.
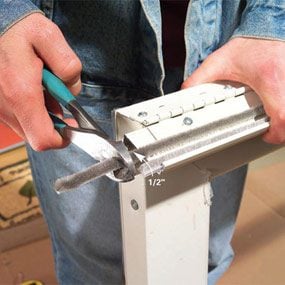
Photo v: Cut the weatherstripping
Center the weatherstripping in the Z-bar, then snip off the ends, leaving it 1/2 in. extra long at each end.
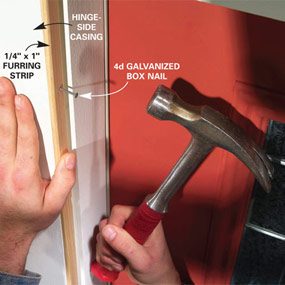
Photo 6: Add together a furring strip
Measure the opening width and determine the furring strip thickness (see text). Cut a furring strip to length, then nail it to the within edge of the hinge-side casing with four evenly spaced 4d galvanized box nails.
Storm doors hang from the door trim, technically chosen "exterior casing." If the door has never had a storm door (as in our situation), yous may take to extend the trim between the door and a sidelight (Photo 2). This is the most difficult situation yous're likely to meet. Y'all take to rip a new trim piece to lucifer the thickness of the other trim (ordinarily 1-i/eight in. thick).
If your entry door trim needs paint, do it at present. Information technology's a pain in the neck painting around a new door, and you lot'll take a crisper-looking chore.
Manufacturers brand storm doors a bit narrower than standard openings to brand sure they'll fit. If your opening is typical, you'll have to "fur out" the sides to heart the storm door in the opening. You'll nearly always need to install at least ane one/4-in. furring strip (screen molding usually works fine) on the hinge side (Photo 6) and possibly even have to add some other one to the latch side (Photo 11). To figure this out, measure out the exact width of the opening, that is, the distance between the inside edges of the trim. (Measure at the middle, top and bottom.) The manufacturer's instructions will commonly list the minimum width required. Subtract that width from your measurement and make the furring strip thickness along the hinge side nearly one-half the deviation.
Step v: Install the door
Photo seven: Gear up the door in place
Elevator the door into the opening and pry information technology against the hinge-side casing with a twist from a rubber-handled pliers on the latch side. Screw the hinge Z-bar into the door casing side.
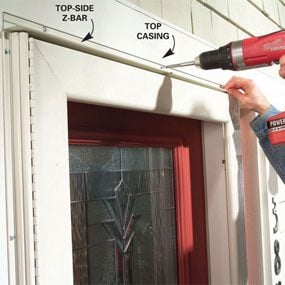
Photo 8: Install the top Z-bar
Swing the door open, slip the top-side Z-bar into place and close the door to hold it. Adjust the gap betwixt the Z-bar and the superlative of the door until information technology's even and screw information technology into the top casing.
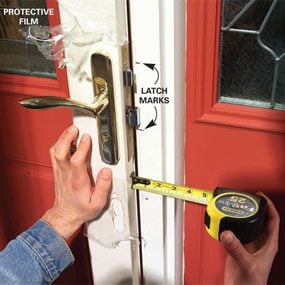
Photo 9: Mount the latch
Mount the latch machinery, then mark the position of the top and bottom of the latch on the door casing. If the space between the door and the casing is over 5/8 in., nail two 1/4-in. thick furring strips to the inside of the casing, one above and one below the marks (see Photograph 11).
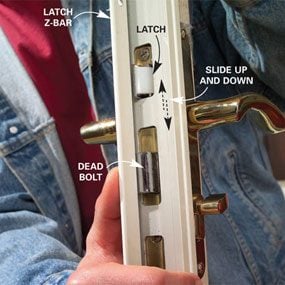
Photo 10: Cut the latch-side Z-bar
Concord the latch-side Z-bar against the open door and center the holes on the latches. Then push the door and Z-bar against the door frame and mark and cutting the bottom at the angle of the threshold. Then mark the top (shut-upwardly photo, next) and cutting it.

Close-upward
Marker and cut the pinnacle of the latch-side Z-bar.
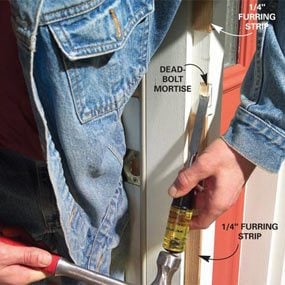
Photo eleven: Chisel the dead commodities mortise
Close the door confronting the casing with the dead bolt extended and chisel out the woods where the deadbolt hits. Slip the latchside Z-bar into place, close the door confronting it and screw it to the casing, keeping a consequent 1/8-in. gap with the door.
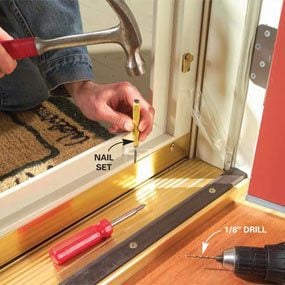
Photograph 12: Adjust the door sweep
Slide the rubber weatherstripping into the door sweep and crimp the ends. Slide the sweep over the door bottom and tap it downwardly to snug it to the threshold. Drill 1/8-in. holes through the adjustment slots and add the screws.
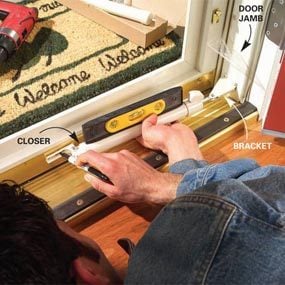
Photo 13: Attach closers
Position the closer bracket and screw it to the jamb. Attach the closer, level information technology and marking the spiral positions on the door. Drill 1/eight-in. airplane pilot holes and screw the closer to the door. Repeat for the top closer.
It'south important to mountain the door tightly to the hinge-side trim. Pry against the latch side to brand sure it snugs up tight. (Photo 7).
Follow the photos with your instructions for the residuum of the installation steps. Door latch and Z-bar systems vary. Cutting the latch-side Z-bar is a bit fussy. The idea is to eye information technology on the latch and lock (Photo 10). Notice where it strikes the sill and cutting the lesser at an angle that matches the sill. Then cut the top so information technology fits confronting the top Z-bar. Don't worry if the latch and lock commodities end up a flake off-middle, as long as they piece of work smoothly.
You may need to chisel out the latch or deadbolt pocket as nosotros show (Photograph 11). Information technology all depends on the door latch style.
After installing the door sweep and closers, adjust the closer tension. Begin with the window panel rather than the screen in place. The closers should exist set with the door at its heaviest. You lot may want to reset a gentler setting for the screen panel.
Finally, information technology's a adept idea to save the boxes for the window and screen panel for off-season storage. Under a bed is a great rubber storage location.
Dealing With Warped Doors
Tempest doors often appear to be warped because they don't residual evenly against the weatherstripping at all corners. All the same, information technology's usually the entry door trim that's a chip out of whack. Small-scale gaps may disappear when you install the door closers, especially if your door comes with i for the tiptop and one for the bottom. If that doesn't do the flim-flam, effort prying out the Z-bar slightly and sideslip in a shim to shut the gap.
Bigger gaps call for more drastic measures. First, loosen all the Z-bar screws and remove the screws at opposite corners of the door. And so slip a shim behind the corner screws, opposite the gap. Tighten the corner screws to run into if the gap closes. Effort varying sizes of shims until the door closes well. Then slip in progressively smaller shims behind the residuum of the screws as y'all tighten them to taper the gap between the Z-bar and the door casing. Cutting off the shims, then caulk the gap and paint information technology to match.
Required Tools for this Project
Accept the necessary tools for this DIY project lined upwardly before you kickoff—you'll save time and frustration.
Required Materials for this Projection
Avoid last-minute shopping trips by having all your materials ready ahead of time. Here's a list.
Originally Published: January 18, 2022

Source: https://preprod.familyhandyman.com/project/storm-door-replacement/
Posted by: beresfordbrishemed.blogspot.com
0 Response to "How To Install A Storm Door With One Sidelight"
Post a Comment